Difference between revisions of "Lower Passages"
WikimanBot (talk | contribs) |
|||
| (33 intermediate revisions by 3 users not shown) | |||
| Line 1: | Line 1: | ||
{{Location Infobox | {{Location Infobox | ||
| − | | name = | + | | name = Lower Passages |
| type = Major location | | type = Major location | ||
| control = none | | control = none | ||
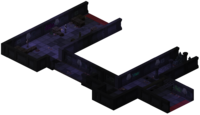
| − | | image = | + | | maptext = A network of utility passages sprawling underneath the lower metro system. |
| + | | image = Global Map LUP.png | ||
| music = WarehouseHorror.ogg | | music = WarehouseHorror.ogg | ||
| world = [[Lower Underrail]] | | world = [[Lower Underrail]] | ||
| areas = Under-passages | | areas = Under-passages | ||
| exits = [[Lower Underrail]] (multiple exits)<br>[[Core City]]'s passages<br>[[Free Drones Base]]<br>[[Lurker Base]] | | exits = [[Lower Underrail]] (multiple exits)<br>[[Core City]]'s passages<br>[[Free Drones Base]]<br>[[Lurker Base]] | ||
| + | | ftravel = [[Rift]] (one zone south of [[Free Drones Base|FD base]]) | ||
| npcs = [[Blaine]] | | npcs = [[Blaine]] | ||
| mapfile = lup-a1, lup-a2, lup-a3, lup-a4, lup-a5, lup-a6, lup-a7, lup-a8, lup-a9, lup-a10, lup-a11, lup-a12<br>lup-b1, lup-b3 | | mapfile = lup-a1, lup-a2, lup-a3, lup-a4, lup-a5, lup-a6, lup-a7, lup-a8, lup-a9, lup-a10, lup-a11, lup-a12<br>lup-b1, lup-b3 | ||
}} | }} | ||
| − | + | '''Lower Passages''', also known as the '''under-passages''' of Lower Underrail, are a network of smaller service tunnels and escape routes immediately below the main routes and metro tunnels of [[Lower Underrail]]. | |
| + | |||
| + | === Underpassages A1 === | ||
| + | * The east exits lead to area '''Underpassages A2''' | ||
| + | * The northwest exit leads to area '''Underpassages A3''' | ||
| + | * The northeast exit leads to area '''Underpassages A4''' | ||
| + | * The 3 different stairs up all lead to [[Lower Underrail]], area '''Lower Underrail A1''' | ||
| + | * A few hostile [[Stalker]]s inhabit the tunnels | ||
| + | * Two doors require 15 [[Lockpicking]], but it's possible walk around them | ||
| + | * On the east wall next to the explosive barrel is a hidden door (need 7 [[Perception]]) which leads to an area with 2 lockers, one of them containing a [[Strange Comm Device]] oddity, 1 XP | ||
| + | * The SW part: | ||
| + | ** Is accessible from [[South Gate Station]] level 1, area '''Underpass''' | ||
| + | ** Has [[Harland]] monitoring the tunnels | ||
| + | ** Has a locker requiring 40 [[Lockpicking]] | ||
| + | * To the south is a closed door with an Intercom: | ||
| + | ** The door can be opened with 80 [[Hacking]] | ||
| + | ** The Intercom password can be learned when doing the [[Find Blaine]] or [[Kill Blaine]] quests | ||
| + | * The door leads to [[Blaine]]'s shop: | ||
| + | ** [[Blaine]] has the protection of two [[Scavenger]]s, one armed with an assault rifle and the other with a sledgehammer | ||
| + | ** [[Blaine]] carries a [[Scrapper Insignia]] oddity, 2 XP | ||
| + | ** Locked locker requires 60 [[Lockpicking]] | ||
| + | ** Locked box requires 60 [[Hacking]] | ||
| + | |||
| + | === Underpassages A2 === | ||
| + | * The western exits lead to area '''Underpassages A1''' | ||
| + | * The eastern exit leads to [[Lower Underrail]], area '''Lower Underrail A6''' | ||
| + | * North of the eastern exit, on the other side on the rocks (can run around them) is a box that requires 25 [[Hacking]] | ||
| + | * In the central room with the explosive barrel is a [[Stalker]] | ||
| + | * There's another [[Stalker]] in the east corridor | ||
| + | * North of the central room is a room blocked by some [[Destructible objects|destructible rocks]]: | ||
| + | ** It has a [[Stalker]] | ||
| + | ** The middle shelves have a [[Tooth Necklace]] oddity, 1 XP | ||
| + | * South of the NW exit is a locked door requiring 10 [[Lockpicking]] (but it's possible to use another corridor to go around it) | ||
| + | * The room in the northeast: | ||
| + | ** Is accessed from a door requiring 10 [[Lockpicking]] | ||
| + | ** Has a [[Stalker]] | ||
| + | ** Has a locker with an [[Eye Patch]] oddity, 1 XP | ||
| + | * The north room: | ||
| + | ** Its door requires 15 [[Lockpicking]] | ||
| + | ** Has a couple of [[Rathound]]s and a [[Rathound Alpha]] | ||
| + | ** Has shelves with an [[Old Train Schedule]] oddity, 1 XP | ||
| + | |||
| + | === Underpassages A3 === | ||
| + | * The northern exit leads to area '''Underpassages A6''' | ||
| + | * The western exit leads to area '''Underpassages B1''' | ||
| + | * The southern exit leads to area '''Underpassages A1''' | ||
| + | * Some [[Destructible objects|destructible rocks]] separate the southern exit from the rest of the area | ||
| + | * A long east-west corridor has a door to the east requiring 30 [[Lockpicking]]. | ||
| + | * The south room has some hostile [[Lurker Psionic]] and [[Lurker Gunner]] | ||
| + | |||
| + | === Underpassages A4 === | ||
| + | * The south exit leads to area '''Underpassages A1''' | ||
| + | * The east exit leads to area '''Underpassages A5''' | ||
| + | * The north exit leads to area '''Underpassages A7''' | ||
| + | * Just east of the south exit is a small storage room: | ||
| + | ** Its door requires 50 [[Lockpicking]] | ||
| + | ** It has a locker with an [[Encyclopedia Fragment]] oddity, 1 XP | ||
| + | * North of the south exit are some [[Destructible objects|destructible rocks]] | ||
| + | * The central part has a [[Lurker Gunner]] | ||
| + | |||
| + | === Underpassages A5 === | ||
| + | * The west exit leads to area '''Underpassages A4''' | ||
| + | * The north exit leads to [[Lurker Base]] | ||
| + | * The long corridor in front of the west exit has a [[Burrower Poison Bear Trap]] and, much further to the east, a [[Bear Trap]]. It can be recovered with 90 [[Traps]] | ||
| + | * The room SE of the west exit: | ||
| + | ** Has a stealthy [[Lurker Murderer]] | ||
| + | ** Has shelves containing a [[Tooth Necklace]] oddity, 1 XP | ||
| + | * The locker room to the SE: | ||
| + | ** Its door requires 35 [[Lockpicking]] | ||
| + | ** Has lockers with some components and a [[Blueprint: Goggles]] | ||
| + | |||
| + | === Underpassages A6 === | ||
| + | * The northern exit leads to area '''Underpassages A9''' | ||
| + | * The western exit leads to area '''Underpassages B3''' | ||
| + | * The southern exit leads to area '''Underpassages A3''' | ||
| + | * The eastern stairs lead to [[Lower Underrail]], area '''Lower Underrail B10''' (near [[South Gate Station]]) | ||
| + | * The northeast room is locked and is only accessible during [[Protectorate]] questline | ||
| + | |||
| + | === Underpassages A7 === | ||
| + | * The north exit leads to area '''Underpassages A10''' | ||
| + | * The south exit leads to area '''Underpassages A4''' | ||
| + | * The east exit leads to [[Lurker Base]] | ||
| + | ** On the north side: | ||
| + | ** The door around the surveillance room requires 50 [[Hacking]] | ||
| + | ** The corridor is patrolled by a [[Lurker Psionic]] | ||
| + | ** The barrel near the east exit contains a [[Train Driver Manual]] oddity, 1 XP | ||
| + | ** The surveillance room: | ||
| + | *** Is guarded by a [[Lurker Gunner]], [[Lurker Hunter]] and [[Lurker Gunslinger]] | ||
| + | *** The desk contains an [[Old World Booze Bottle]] oddity, 2 XP | ||
| + | *** The locker contains a [[Tooth Necklace]] oddity, 1 XP | ||
| + | |||
| + | === Underpassages A8 === | ||
| + | * The area A8 is known as [[Lurker Base]]. Refer to it for details. | ||
| + | |||
| + | === Underpassages A9 === | ||
| + | * The northern exit leads to area '''Underpassages A11''' | ||
| + | * The southern exit leads to area '''Underpassages A6''' | ||
| + | * The eastern exits lead to area '''Underpassages A10''' | ||
| + | * In the north corridor is waiting a [[Lurker Murderer]] in the shadows | ||
| + | * In the central lit part, a pipe contains a [[Human Scalp]] oddity, 3 XP | ||
| + | |||
| + | === Underpassages A10 === | ||
| + | * The western exits lead to area '''Underpassages A9''' | ||
| + | * The northern exit leads to area '''Underpassages A12''' | ||
| + | * The southeastern exit leads to [[Lurker Base]] | ||
| + | * The southwestern exit leads to area '''Underpassages A7''' | ||
| + | * The stairs on the east side lead to [[Lower Underrail]], area '''Lower Underrail B15''' | ||
| + | * The western room has: | ||
| + | ** Shelves containing a [[Tooth Necklace]] oddity, 1 XP | ||
| + | ** A locker requiring 35 [[Lockpicking]] | ||
| + | * The eastern room has: | ||
| + | ** A fridge containing an [[Eye Patch]] oddity, 1 XP | ||
| + | * The eastern parts(from north to south) are inhabited by several [[Lurker Gunner]], [[Lurker Psionic]] and [[Lurker Assassin]] | ||
| + | * A [[Lurker Cut-Throat]] is hiding in the NW corner of the corrridors | ||
| + | * There are a few traps (one of each [[Bear Trap]], [[Acid Blob Trap]], [[Burrower Poison Bear Trap]] and [[HE Mine]]) in the corridors. They can be recovered with 100 [[Traps]] skill | ||
| + | |||
| + | === Underpassages A11 === | ||
| + | * The northern exit leads to [[Core City passages]], area '''Passages''' | ||
| + | * The southern exit leads to area '''Underpassages A9''' | ||
| + | * The [[Praetorian Bomber]], [[Praetorian Enforcer]] and [[Praetorian Sniper]] each carry a [[Praetorian Security Insignia]] oddity, 3 XP | ||
| + | * A barrel in the room in the center contains an [["ArenaNow" Broadcasting Schedule]] oddity, 1 XP | ||
| + | |||
| + | === Underpassages A12 === | ||
| + | * The southern exit leads to area '''Underpassages A10''' | ||
| + | * There are several pit traps, in which you can fall to get to the basement with 3 [[Dog|Hungry Dog]]s | ||
| + | * The north room: | ||
| + | ** The west door requires 65 [[Lockpicking]] or [[Rusty Key (Under-passages)]] | ||
| + | ** The east door is a [[Destructible objects|destructible flimsy shack]] | ||
| + | ** Has a [[Lurker Gunner]] and [[Lurker Gunslinger]]. The gunslinger carries a [[Rusty Key (Under-passages)]] | ||
| + | |||
| + | === Underpassages B1 === | ||
| + | * The east exit leads to area '''Underpassages A3''' | ||
| + | * The north and south corridors have a [[Bear Trap]] that requires 100 [[Traps]] to disarm | ||
| + | * The SE room | ||
| + | ** Has several [[Lurkers]] and a couple of [[Dog]]s guarding it | ||
| + | ** Has a ladder leading to the basement area ''Underpassages B1 - basement''' | ||
| + | * The central storage room: | ||
| + | ** Has a barrel with a [[Tooth Necklace]] oddity, 1 XP | ||
| + | ** Has a stealthy [[Lurker Hunter]] | ||
| + | |||
| + | === Underpassages B1 basement === | ||
| + | * Accessed from the ladder in the SE room of area '''Underpassages B1''' | ||
| + | * Has some [[Crawler]]s and [[Death Stalker]]s hiding in the shadows | ||
| + | |||
| + | === Underpassages B3 === | ||
| + | * The eastern exit leads to area '''Underpassages A6''' | ||
| + | * The north exit leads to the [[Free Drones Base]] | ||
| + | * A door with an Intercom is blocking the way: | ||
| + | ** From the east: it will open if you provide the right password, which you learn during the quest [[Join the Free Drones]] | ||
| + | ** From the west: an electronic lock opens the door. It can be opened with 75 [[Hacking]] or with a [[Free Drones Hideout Keycard]] | ||
| + | * The north exit is guarded by [[Jaina]], [[Hutch]], [[Laser]] and [[Casper]] | ||
| + | * Each of the 3 guards carry an [[Anarchist Symbol]] oddity, 3 XP | ||
== Points of interest == | == Points of interest == | ||
| Line 24: | Line 177: | ||
== Map gallery == | == Map gallery == | ||
<gallery widths=200px heights=127px> | <gallery widths=200px heights=127px> | ||
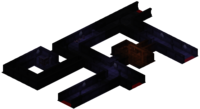
| + | Global Map LUP.png | Lower Passages [[Global Map]] | ||
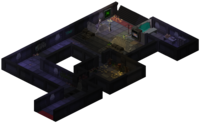
lup-a1.png | Under-passages A1, [[Blaine]]'s shop, connects to [[South Gate Station]] metro underpass | lup-a1.png | Under-passages A1, [[Blaine]]'s shop, connects to [[South Gate Station]] metro underpass | ||
lup-a2.png | Under-passages A2, connects to southeast [[Lower Underrail]] | lup-a2.png | Under-passages A2, connects to southeast [[Lower Underrail]] | ||
| Line 40: | Line 194: | ||
lup-a12_1.png | Under-passages A12 (trap pit) | lup-a12_1.png | Under-passages A12 (trap pit) | ||
lup-b1.png | Under-passages B1, connects to [[Lower Underrail]] south of RC | lup-b1.png | Under-passages B1, connects to [[Lower Underrail]] south of RC | ||
| − | lup-b1_1.png | Under-passages B1, | + | lup-b1_1.png | Under-passages B1, basement |
lup-b3.png | Under-passages B3, connects to [[Free Drones Base]] and near [[Rail Crossing]] | lup-b3.png | Under-passages B3, connects to [[Free Drones Base]] and near [[Rail Crossing]] | ||
</gallery> | </gallery> | ||
Latest revision as of 09:17, 13 November 2023
| Lower Passages | |||||
A network of utility passages sprawling underneath the lower metro system.
| |||||
|---|---|---|---|---|---|

| |||||
| Major location information | |||||
| Music | Cornered | ||||
| Located in | Lower Underrail | ||||
| Areas | Under-passages | ||||
| Connections | Lower Underrail (multiple exits) Core City's passages Free Drones Base Lurker Base | ||||
| Fast Travel | Rift (one zone south of FD base) | ||||
| NPCs | Blaine | ||||
| |||||
Lower Passages, also known as the under-passages of Lower Underrail, are a network of smaller service tunnels and escape routes immediately below the main routes and metro tunnels of Lower Underrail.
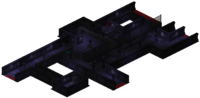
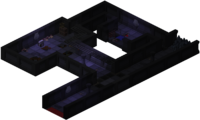
Underpassages A1
- The east exits lead to area Underpassages A2
- The northwest exit leads to area Underpassages A3
- The northeast exit leads to area Underpassages A4
- The 3 different stairs up all lead to Lower Underrail, area Lower Underrail A1
- A few hostile Stalkers inhabit the tunnels
- Two doors require 15 Lockpicking, but it's possible walk around them
- On the east wall next to the explosive barrel is a hidden door (need 7 Perception) which leads to an area with 2 lockers, one of them containing a Strange Comm Device oddity, 1 XP
- The SW part:
- Is accessible from South Gate Station level 1, area Underpass
- Has Harland monitoring the tunnels
- Has a locker requiring 40 Lockpicking
- To the south is a closed door with an Intercom:
- The door can be opened with 80 Hacking
- The Intercom password can be learned when doing the Find Blaine or Kill Blaine quests
- The door leads to Blaine's shop:
- Blaine has the protection of two Scavengers, one armed with an assault rifle and the other with a sledgehammer
- Blaine carries a Scrapper Insignia oddity, 2 XP
- Locked locker requires 60 Lockpicking
- Locked box requires 60 Hacking
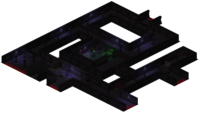
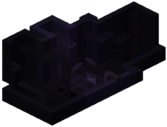
Underpassages A2
- The western exits lead to area Underpassages A1
- The eastern exit leads to Lower Underrail, area Lower Underrail A6
- North of the eastern exit, on the other side on the rocks (can run around them) is a box that requires 25 Hacking
- In the central room with the explosive barrel is a Stalker
- There's another Stalker in the east corridor
- North of the central room is a room blocked by some destructible rocks:
- It has a Stalker
- The middle shelves have a Tooth Necklace oddity, 1 XP
- South of the NW exit is a locked door requiring 10 Lockpicking (but it's possible to use another corridor to go around it)
- The room in the northeast:
- Is accessed from a door requiring 10 Lockpicking
- Has a Stalker
- Has a locker with an Eye Patch oddity, 1 XP
- The north room:
- Its door requires 15 Lockpicking
- Has a couple of Rathounds and a Rathound Alpha
- Has shelves with an Old Train Schedule oddity, 1 XP
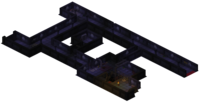
Underpassages A3
- The northern exit leads to area Underpassages A6
- The western exit leads to area Underpassages B1
- The southern exit leads to area Underpassages A1
- Some destructible rocks separate the southern exit from the rest of the area
- A long east-west corridor has a door to the east requiring 30 Lockpicking.
- The south room has some hostile Lurker Psionic and Lurker Gunner
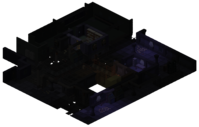
Underpassages A4
- The south exit leads to area Underpassages A1
- The east exit leads to area Underpassages A5
- The north exit leads to area Underpassages A7
- Just east of the south exit is a small storage room:
- Its door requires 50 Lockpicking
- It has a locker with an Encyclopedia Fragment oddity, 1 XP
- North of the south exit are some destructible rocks
- The central part has a Lurker Gunner
Underpassages A5
- The west exit leads to area Underpassages A4
- The north exit leads to Lurker Base
- The long corridor in front of the west exit has a Burrower Poison Bear Trap and, much further to the east, a Bear Trap. It can be recovered with 90 Traps
- The room SE of the west exit:
- Has a stealthy Lurker Murderer
- Has shelves containing a Tooth Necklace oddity, 1 XP
- The locker room to the SE:
- Its door requires 35 Lockpicking
- Has lockers with some components and a Blueprint: Goggles
Underpassages A6
- The northern exit leads to area Underpassages A9
- The western exit leads to area Underpassages B3
- The southern exit leads to area Underpassages A3
- The eastern stairs lead to Lower Underrail, area Lower Underrail B10 (near South Gate Station)
- The northeast room is locked and is only accessible during Protectorate questline
Underpassages A7
- The north exit leads to area Underpassages A10
- The south exit leads to area Underpassages A4
- The east exit leads to Lurker Base
- On the north side:
- The door around the surveillance room requires 50 Hacking
- The corridor is patrolled by a Lurker Psionic
- The barrel near the east exit contains a Train Driver Manual oddity, 1 XP
- The surveillance room:
- Is guarded by a Lurker Gunner, Lurker Hunter and Lurker Gunslinger
- The desk contains an Old World Booze Bottle oddity, 2 XP
- The locker contains a Tooth Necklace oddity, 1 XP
Underpassages A8
- The area A8 is known as Lurker Base. Refer to it for details.
Underpassages A9
- The northern exit leads to area Underpassages A11
- The southern exit leads to area Underpassages A6
- The eastern exits lead to area Underpassages A10
- In the north corridor is waiting a Lurker Murderer in the shadows
- In the central lit part, a pipe contains a Human Scalp oddity, 3 XP
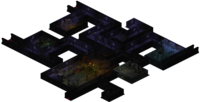
Underpassages A10
- The western exits lead to area Underpassages A9
- The northern exit leads to area Underpassages A12
- The southeastern exit leads to Lurker Base
- The southwestern exit leads to area Underpassages A7
- The stairs on the east side lead to Lower Underrail, area Lower Underrail B15
- The western room has:
- Shelves containing a Tooth Necklace oddity, 1 XP
- A locker requiring 35 Lockpicking
- The eastern room has:
- A fridge containing an Eye Patch oddity, 1 XP
- The eastern parts(from north to south) are inhabited by several Lurker Gunner, Lurker Psionic and Lurker Assassin
- A Lurker Cut-Throat is hiding in the NW corner of the corrridors
- There are a few traps (one of each Bear Trap, Acid Blob Trap, Burrower Poison Bear Trap and HE Mine) in the corridors. They can be recovered with 100 Traps skill
Underpassages A11
- The northern exit leads to Core City passages, area Passages
- The southern exit leads to area Underpassages A9
- The Praetorian Bomber, Praetorian Enforcer and Praetorian Sniper each carry a Praetorian Security Insignia oddity, 3 XP
- A barrel in the room in the center contains an "ArenaNow" Broadcasting Schedule oddity, 1 XP
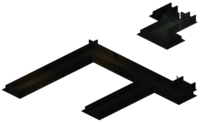
Underpassages A12
- The southern exit leads to area Underpassages A10
- There are several pit traps, in which you can fall to get to the basement with 3 Hungry Dogs
- The north room:
- The west door requires 65 Lockpicking or Rusty Key (Under-passages)
- The east door is a destructible flimsy shack
- Has a Lurker Gunner and Lurker Gunslinger. The gunslinger carries a Rusty Key (Under-passages)
Underpassages B1
- The east exit leads to area Underpassages A3
- The north and south corridors have a Bear Trap that requires 100 Traps to disarm
- The SE room
- The central storage room:
- Has a barrel with a Tooth Necklace oddity, 1 XP
- Has a stealthy Lurker Hunter
Underpassages B1 basement
- Accessed from the ladder in the SE room of area Underpassages B1
- Has some Crawlers and Death Stalkers hiding in the shadows
Underpassages B3
- The eastern exit leads to area Underpassages A6
- The north exit leads to the Free Drones Base
- A door with an Intercom is blocking the way:
- From the east: it will open if you provide the right password, which you learn during the quest Join the Free Drones
- From the west: an electronic lock opens the door. It can be opened with 75 Hacking or with a Free Drones Hideout Keycard
- The north exit is guarded by Jaina, Hutch, Laser and Casper
- Each of the 3 guards carry an Anarchist Symbol oddity, 3 XP
Points of interest
- Blaine's shop
- Free Drones Base
- Lurker Base
Enemies
The passages are mainly inhabited by the lurker bandits whose base is also hidden within the passages. Some stalkers also dwell in the passages, and crawlers can be encountered in the darkest areas.
Map gallery
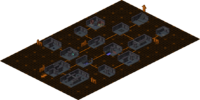
Lower Passages Global Map
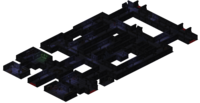
Under-passages A1, Blaine's shop, connects to South Gate Station metro underpass
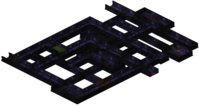
Under-passages A2, connects to southeast Lower Underrail
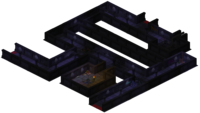
Under-passages A3
Under-passages A4

Under-passages A5

Under-passages A6
Under-passages A7
Under-passages A8, Lurker Base
Lurker Base ventilation shafts
Under-passages A9
Under-passages A10, connects to small ironhead camp in Lower Underrail
Under-passages A10 ventilation shafts
Under-passages A11, connects to Core City passages
Under-passages A12
Under-passages A12 (trap pit)
Under-passages B1, connects to Lower Underrail south of RC
Under-passages B1, basement
Under-passages B3, connects to Free Drones Base and near Rail Crossing


| |||||||||||||||||||||||||||||||||||||||||||||||||||||||||||