Difference between revisions of "Drop Zone"
Jump to navigation
Jump to search
| Line 12: | Line 12: | ||
}} | }} | ||
| − | The [[Drop Zone]] spans the eastern side of [[Core City]]'s [[Core City Middle Level|middle]] and [[Core City Lower Level|lower]] levels. | + | The [[Drop Zone]] spans the eastern side of [[Core City]]'s [[Core City Middle Level|middle]] (upper Drop Zone) and [[Core City Lower Level|lower]] (lower Drop Zone) levels. |
== Description == | == Description == | ||
The drop zone is the slum of Core City. It's full of zoners and other undesirables that perish daily from hunger, disease and gang fighting. | The drop zone is the slum of Core City. It's full of zoners and other undesirables that perish daily from hunger, disease and gang fighting. | ||
| − | === Drop Zone, west shelters === | + | === Upper Drop Zone, west shelters === |
* The western exits lead to [[Core City Middle Level]], area '''Bar backdoor, edge of drop zone''' | * The western exits lead to [[Core City Middle Level]], area '''Bar backdoor, edge of drop zone''' | ||
* In a barrel next to the bed on the east side is a [[Barrel Soup Ladle]] oddity, 2 XP | * In a barrel next to the bed on the east side is a [[Barrel Soup Ladle]] oddity, 2 XP | ||
| Line 24: | Line 24: | ||
* The western shed has a door requiring 35 [[Lockpicking]] | * The western shed has a door requiring 35 [[Lockpicking]] | ||
* The northern central shed has a door requiring 45 [[Lockpicking]] | * The northern central shed has a door requiring 45 [[Lockpicking]] | ||
| − | * The northern exit leads to the '''Drop Zone, Broken tunneler''' area | + | * The northern exit leads to the '''Upper Drop Zone, Broken tunneler''' area |
| − | * The eastern exit leads to the '''Drop Zone, east shelters''' area | + | * The eastern exit leads to the '''Upper Drop Zone, east shelters''' area |
| − | === Drop Zone, east shelters === | + | === Upper Drop Zone, east shelters === |
| − | * The western exits lead to the '''Drop Zone, west shelters''' area | + | * The western exits lead to the '''Upper Drop Zone, west shelters''' area |
| − | * The northern exit leads to the '''Drop Zone, Broken tunneler''' area | + | * The northern exit leads to the '''Upper Drop Zone, Broken tunneler''' area |
* The NE room: | * The NE room: | ||
** The door requires 45 [[Lockpicking]] | ** The door requires 45 [[Lockpicking]] | ||
| Line 39: | Line 39: | ||
* The ladder to the east leads to CC6 area {{verify}} | * The ladder to the east leads to CC6 area {{verify}} | ||
| − | === Drop Zone, Broken tunneler === | + | === Upper Drop Zone, Broken tunneler === |
| − | * The south exit leads to the '''Drop Zone, west shelters''' area | + | * The south exit leads to the '''Upper Drop Zone, west shelters''' area |
| − | * The SE exit leads to the '''Drop Zone, east shelters''' area | + | * The SE exit leads to the '''Upper Drop Zone, east shelters''' area |
* The door to the office room in SW corner requires 40 [[Lockpicking]] | * The door to the office room in SW corner requires 40 [[Lockpicking]] | ||
* The gangsters near the tunneler can be persuaded to leave with 35 [[Intimidation]] or 50 [[Persuasion]] | * The gangsters near the tunneler can be persuaded to leave with 35 [[Intimidation]] or 50 [[Persuasion]] | ||
| Line 84: | Line 84: | ||
== Map Gallery == | == Map Gallery == | ||
<gallery widths=200px heights=127px> | <gallery widths=200px heights=127px> | ||
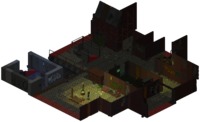
| − | cc14.png | Drop zone, west shelters | + | cc14.png | Upper Drop zone, west shelters |
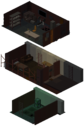
| − | cc14_1.png | Ditch & Oinko | + | cc14_1.png | Upper Drop zone, Ditch & Oinko |
| − | cc14x.png | Oinko (on [[Motion]]) | + | cc14x.png | Upper Drop zone, Oinko (on [[Motion]]) |
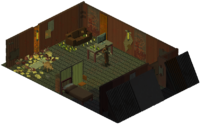
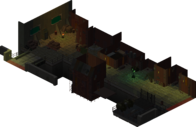
| − | cc15.png | Drop zone, east shelters | + | cc15.png | Upper Drop zone, east shelters |
cc15x.png | Pipeworks | cc15x.png | Pipeworks | ||
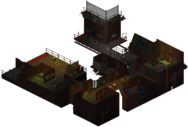
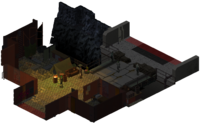
| − | cc16.png | Drop zone, broken tunneler | + | cc16.png | Upper Drop zone, broken tunneler |
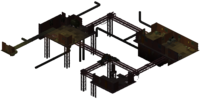
cc_passage.png | Middle/lower level passage | cc_passage.png | Middle/lower level passage | ||
cc_utility.png | Utility tunnels | cc_utility.png | Utility tunnels | ||
| − | cc3.png | Drop zone | + | cc3.png | Lower Drop zone, crossroads |
| − | cc4.png | Drop zone | + | cc4.png | Lower Drop zone |
cc5.png | Edge of drop zone | cc5.png | Edge of drop zone | ||
cc5_1.png | Drop zone | cc5_1.png | Drop zone | ||
| − | cc6.png | Drop zone | + | cc6.png | Lower Drop zone |
| − | cc7.png | Drop zone | + | cc7.png | Lower Drop zone |
</gallery> | </gallery> | ||
Revision as of 14:23, 7 March 2020
| Drop zone | |||||

| |||||
|---|---|---|---|---|---|
| Location information | |||||
| Music | Scattered Remnants | ||||
| Located in | Core City | ||||
| Areas | Drop zone Broken tunneler | ||||
| Connections | Core City Middle Level Core City Lower Level Research Facility Abandoned Facility | ||||
| NPCs | Joe De Pacino, Bogdan, Duff, Svetlana, Tina, Priscilla, Mac, Blanket, Ditch, Oinko, Ljubostanka, Guzomir, Kupusije, Radusinan | ||||
| |||||
The Drop Zone spans the eastern side of Core City's middle (upper Drop Zone) and lower (lower Drop Zone) levels.
Description
The drop zone is the slum of Core City. It's full of zoners and other undesirables that perish daily from hunger, disease and gang fighting.
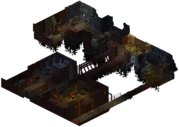
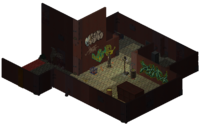
Upper Drop Zone, west shelters
- The western exits lead to Core City Middle Level, area Bar backdoor, edge of drop zone
- In a barrel next to the bed on the east side is a Barrel Soup Ladle oddity, 2 XP
- On the west side beyond the dead body is a stealthy aggressive Mugger. He carries a Core City Plans oddity, 1 XP
- The ladder on the west side leads to Ditch's shelter. The shelter has a barrel containing a Biocorp Technology Catalog Fragment oddity, 1 XP
- The western shed has a door requiring 35 Lockpicking
- The northern central shed has a door requiring 45 Lockpicking
- The northern exit leads to the Upper Drop Zone, Broken tunneler area
- The eastern exit leads to the Upper Drop Zone, east shelters area
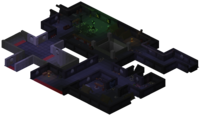
Upper Drop Zone, east shelters
- The western exits lead to the Upper Drop Zone, west shelters area
- The northern exit leads to the Upper Drop Zone, Broken tunneler area
- The NE room:
- The door requires 45 Lockpicking
- The desk contains the unique ZC 99 pistol
- 3 Gangsters are in the southern part of this area (1 is stealthy and carries an Old World Booze Bottle oddity, 2 XP)
- The locker in the SW room requires 60 Lockpicking
- The barrel in the SE corner near the gangsters contains a Rat Head Amulet oddity, 1 XP
- The locker in the E room requires 35 Lockpicking. (Content isVerify? )
- The ladder to the east leads to CC6 areaVerify
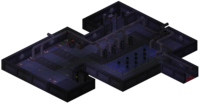
Upper Drop Zone, Broken tunneler
- The south exit leads to the Upper Drop Zone, west shelters area
- The SE exit leads to the Upper Drop Zone, east shelters area
- The door to the office room in SW corner requires 40 Lockpicking
- The gangsters near the tunneler can be persuaded to leave with 35 Intimidation or 50 Persuasion
- The locker on the NW side contains a Biocorp Technology Catalog Fragment oddity, 1 XP
- To interact with the tunneler, check the quest Recover tunneler
Points of interest
- Passage and utility tunnels between middle and lower level
- Broken tunneler and captive Faceless in the north
- Pipeworks
- Coretech Research Facility entrance in the lower level
- Black Crawler camp in the north
Quests
- Repair tunneler: the broken tunneler is in northern end of the zone
- Find Bogdan: he's hiding in the drop zone's pipeworks
- Retrieve ICPD: persons related to this quest are in the drop zone
Characters
Map Gallery
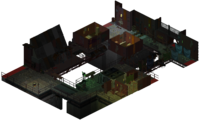
Upper Drop zone, west shelters
Upper Drop zone, Ditch & Oinko

Upper Drop zone, Oinko (on Motion)
Upper Drop zone, east shelters
Pipeworks
Upper Drop zone, broken tunneler
Middle/lower level passage
Utility tunnels
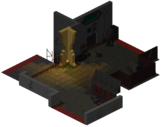
Lower Drop zone, crossroads
Lower Drop zone
Edge of drop zone
Drop zone
Lower Drop zone
Lower Drop zone


| |||||||||||||||||||||||||||||||||||||||||||||||||||||||||||