Difference between revisions of "GMS compound"
m |
|||
| (33 intermediate revisions by 6 users not shown) | |||
| Line 2: | Line 2: | ||
| name = GMS compound | | name = GMS compound | ||
| type = Dungeon | | type = Dungeon | ||
| − | | control = | + | | control = varies |
| + | | maptext = The GMS compound used to belong to Omega station, before it was abandoned. | ||
| image = GMS1.jpg | | image = GMS1.jpg | ||
| + | | music = WarehouseHorror.ogg | ||
| world = [[Lower Underrail]] | | world = [[Lower Underrail]] | ||
| areas = [[GMS compound level 1]]<br>[[GMS Compound - Cave]]<br>[[GMS compound level 2]]<br>[[GMS compound level 3]]<br>[[Burrower Caves]] | | areas = [[GMS compound level 1]]<br>[[GMS Compound - Cave]]<br>[[GMS compound level 2]]<br>[[GMS compound level 3]]<br>[[Burrower Caves]] | ||
| − | | exits = [[GMS warehouse block]]<br>[[ | + | | exits = [[GMS warehouse block]]<br>[[Upper Caves]]<br>[[Lower Caves]] |
| npcs = [[Gorsky]], [[Sully]] | | npcs = [[Gorsky]], [[Sully]] | ||
| mapfile = GammaCompound1<br>GammaCompound1Cave<br>GammaCompound2<br>GammaCompound3<br>burc1 | | mapfile = GammaCompound1<br>GammaCompound1Cave<br>GammaCompound2<br>GammaCompound3<br>burc1 | ||
}} | }} | ||
| − | + | '''GMS compound''' is the first major dungeon the player visits during ''Underrail'' storyline. It is located in Lower Underrail, and can be accessed via the Lower Underrail exit from [[South Gate Station]], by heading north from the station platform on SGS level 1. | |
The player travels there during [[Gorsky's task]] and is tasked with finding a way to open the sealed door on the first level of GMS compound. | The player travels there during [[Gorsky's task]] and is tasked with finding a way to open the sealed door on the first level of GMS compound. | ||
| + | |||
== Level 1: Offices == | == Level 1: Offices == | ||
| Line 22: | Line 25: | ||
During your mission here, [[Gorsky]]'s team will be waiting near the entrance. | During your mission here, [[Gorsky]]'s team will be waiting near the entrance. | ||
| − | + | * A room in the southwest part of the area has a door requiring 25 [[Hacking]]. | |
| − | An adjacent watery natural cave with even more rathounds in it. Some [[Mindshroom]]s also grow here. | + | ** The room can also be entered through the ventilation shafts |
| + | ** It contains a backpack with an [[Omega ID Card]] oddity, 1 XP | ||
| + | ** The backpack also contains a [[Key (GMS)]] | ||
| + | ** It also has hidden safe (detected with 7 [[Perception]]), which can be opened with 30 [[Lockpicking]], contains 25 charons, a pistol and some ammo | ||
| + | * In the southeast corner is a Power Generator. It can be configured to bring power back to the elevator | ||
| + | * In the southeast part of the area, there's a room with a footlocker that requires 25 [[Lockpicking]] or can be opened with the [[Key (GMS)]]. It contains one [[Psi Booster]] | ||
| + | * South of the entrance is a room with blood and bones. A locker in this room contains an [[Omega ID Card]] oddity, 1 XP | ||
| + | * West of the entrance is a room that has a door requiring 20 [[Lockpicking]]. | ||
| + | ** There's another door/entrance in the back which is not locked (but the path to reach it is much longer) | ||
| + | ** The northern desk in that room contains a [[Protectorate Propaganda]] oddity, 1 XP | ||
| + | ** The same desk also has a [[Surveillance Room Keycard (GMS)]] | ||
| + | * The room to the northwest has a door that requires 20 [[Hacking]] | ||
| + | ** It has another opening from the back, that can be reached from the ventilation shafts | ||
| + | ** The southern locker in the room requires 30 [[Lockpicking]], contains [[Bandages]] and 15 [[5mm W2C Round]]s | ||
| + | ** The middle locker in the room contains an [[Adrenaline Shot]] | ||
| + | ** The northern locker in the room contains an [[Omega ID Card]] oddity, 1 XP | ||
| + | * The level 2 below can be reached: | ||
| + | ** Either by using the stairs which is the exit in the northwest corner of the area | ||
| + | ** Or by using the elevator on the west wall after restoring power with the generators in the southeast corner | ||
| + | * The storage room locked behind heavy doors on the north side can be opened after the quest is complete. Refer to [[Gorsky's task]] for details. It leads to the [[:File:Burc1.png|burrower caves]] | ||
| + | |||
| + | == GMS Compound - Cave == | ||
| + | An adjacent watery natural cave with even more [[Rathound|rathounds]] in it. Some [[Mindshroom]]s also grow here. | ||
| + | |||
| + | * 3 respawning [[Mindshroom]]s | ||
| + | * Several [[Rathound|rathounds]] including a [[Rathound Alpha]] | ||
| − | This cave also leads to [[ | + | This cave also leads to [[Upper Caves]] area '''Upper Caves A6''', but [[TNT Charge]]s are needed to advance further. |
== Level 2: Storage == | == Level 2: Storage == | ||
| − | This level is largely devoid of living creatures. Armed [[Sentry Bot]]s roam around. Breaking in to the storage rooms can yield some useful loot. | + | This level is largely devoid of living creatures. Armed [[Sentry Bot]]s and [[Small Sentry Bot]]s roam around. Being seen by the cameras will attract the bots towards you. Breaking in to the storage rooms can yield some useful loot. |
The stairway leading down is blocked by rubble, so the player has to find another way to advance. | The stairway leading down is blocked by rubble, so the player has to find another way to advance. | ||
| + | |||
| + | * In the middle room: | ||
| + | ** the upper box contains a [[Protectorate Propaganda]] oddity, 1 XP | ||
| + | ** the dead body has an [[Emergency Hatch Key (GMS)]], which opens the trap door in the SE corner of the area | ||
| + | * In the southwest, 2 bluish rooms require 50 [[Hacking]] or [[Biology Lab Key Card (GMS)]] to open the doors | ||
| + | ** The first one has 2 respawning [[Mindshroom]]s | ||
| + | ** The second one has 1 respawning [[Mindshroom]] and a freezer containing a lot of [[Mindshroom]]s | ||
| + | * The room north of the mushrooms can be unlocked with 20 [[Hacking]] or with the [[Surveillance Room Keycard (GMS)]] found on the first floor | ||
| + | ** The desk contains an [[Omega ID Card]] oddity, 1 XP | ||
| + | ** Shelves contain two [[EMP Grenade]]s | ||
| + | ** The safe requires 30 [[Lockpicking]] | ||
| + | * To the south is a room requiring 30 [[Hacking]] to open any of its 2 doors | ||
| + | ** It can also be accessed from the ventilation shafts | ||
| + | ** The shelves contain an [[Omega ID Card]] oddity, 1 XP | ||
| + | * In the SE corner there are 2 rooms: | ||
| + | ** The north one has shelves containing a [[Warehouse Inventory List]] oddity, 2 XP | ||
| + | ** The north one also has a footlocker requiring 25 [[Lockpicking]] to open and containing an [[Omega ID Card]] oddity, 1 XP | ||
| + | ** The south one has a locker containing a [[Protectorate Propaganda]] oddity, 1 XP | ||
| + | ** The south one also has a trap door that requires 50 [[Lockpicking]] or can be opened with the [[Emergency Hatch Key (GMS)]] from the dead body in the same area. | ||
| + | * On the eastern wall are some shelves. The south one hides a secret passage (need 7 [[Perception]]) leading to a locker with some loot and an [[Old Data Medium]] oddity, 1 XP | ||
| + | * The room in the NE corner has 2 entrance doors, one is unlocked and the other requires 15 [[Lockpicking]]. It contains a metal crate with an [[Encyclopedia Fragment]] oddity, 1 XP | ||
== Level 3: Commons == | == Level 3: Commons == | ||
| − | This level consists of a relatively clean living area with cafeteria, and some storage rooms. The elevator on this level is broken, but it can be repaired with | + | This level consists of a relatively clean living area with cafeteria, and some storage rooms. The elevator on this level is broken, but it can be repaired with 15 [[mechanics]] skill. This level has been recently overtaken by raiders, coming in from the adjacent [[Lower Caves]]. |
| + | |||
| + | * The eastern exit leads to [[Lower Caves]], area '''Caves 13''' | ||
| + | * The ladder room (first room accessed from the trap door on level 2) : | ||
| + | ** The [[Old Citizen]] can provide information on how the turret near the elevator could be used to fight the raider | ||
| + | ** The [[Raider]] has a [[Ladder Room Key (GMS)]] | ||
| + | ** The door is locked and can be opened with the [[Ladder Room Key (GMS)]] | ||
| + | * North of the ladder room is a turret with a dead man who has [[Bloomberg's Key]] and [[Protectorate Propaganda]] oddity, 1 XP | ||
| + | * East block of 2 rooms with double beds, south room: | ||
| + | ** The footlocker can be opened with 25 [[Lockpicking]], contains some [[Supercharged Lithium Cell]]s | ||
| + | ** The desk contains an [[Omega ID Card]] oddity, 1 XP | ||
| + | * East block of 2 rooms with double beds, north room: | ||
| + | ** The locker requires 25 [[Lockpicking]], contains a [[Flashbang]] and 10 [[5mm W2C Round]]s | ||
| + | * West block of 4 rooms, NE room: | ||
| + | ** The footlocker requires 25 [[Lockpicking]], contains a pistol | ||
| + | * West block of 4 rooms, SE room: | ||
| + | ** The desk contains an [[Omega ID Card]] oddity, 1 XP | ||
| + | * West block of 4 rooms, SW room: | ||
| + | ** The locker contains an [[Omega ID Card]] oddity, 1 XP | ||
| + | ** There is a first aid box hidden under couch containing some medicine including an [[Advanced Health Hypo]] (need 7 [[Perception]]) | ||
| + | * West block of 4 rooms, NW room: | ||
| + | ** The locker requires 30 [[Lockpicking]] or [[Bloomberg's Key]] (found on the dead man east of the same area). | ||
| + | ** This locker contains the [[Level 1 Storage Keycard (GMS)]] need for the quest [[Gorsky's task]] | ||
| + | * Room to the northwest near the stairs | ||
| + | ** The door can be opened with 20 [[Hacking]] or with the [[Surveillance Room Keycard (GMS)]] found on level 1 | ||
| + | ** The desk contains an [[Omega ID Card]] oddity, 1 XP | ||
| + | ** The computer console can be used to reactivate the turret in the main corridor with at least 25 [[Hacking]] | ||
| + | * The kitchen contains multiple food items | ||
| + | * The elevator can be repaired with 15 [[Mechanics]] | ||
| + | * The NPCs [[Sully]], [[Old Citizen]] and [[Citizen]] are all hostages to the raiders on this level | ||
| + | ** [[Sully]] has a [[Biology Lab Key Card (GMS)]] (it can be pickpocketed with 24 effective skill) | ||
; NPCs: | ; NPCs: | ||
| Line 41: | Line 120: | ||
== Burrower Caves == | == Burrower Caves == | ||
| − | [[Burrower]] nesting area near the GMS compound. | + | {{cleanup|reason = This is a random dungeon and can have many different variants, not just this one.}} |
| + | [[Burrower]] nesting area near the GMS compound. It is to the north of the storage room on the level 1 of the compound, and requires completing [[Gorsky's task]] first before it can be accessed (you may have to go back to [[South Gate Station]] and talk to [[Quinton]] to recover the keycard once the quest is complete). | ||
| + | |||
| + | The layout of the cave follows a clockwise spiral, ending at the middle of the cave. | ||
| + | |||
| + | Inside the cave, you will find 3 major groups of burrowers, consisting of 2-3 normal burrowers as well as 3-4 spawns. Note that there are a couple burrowers and spawns between these groups as well. | ||
| + | |||
| + | The first group can be found close to the entrance. As you advance, you will see the cave split into a small wing to the west, which will be inhabited by burrowers. | ||
| + | |||
| + | The second group is located on the northern corridor. It can be found immediately after the pushable rock (strength 8 required). Pushing the rock will trigger a cutscene and immediately dispatch the second group of borrowers. Note, however, that doing so, will block access to a small crevice to the east where the body of a [[Dead_Body|Dead Woman]] can be found. From her body the player can loot a [[Leather Armor|Rathound Leather Armor]], a [[Molotov Cocktail]], a [[Tornado|Tornado Crossbow]], 13 crossbow bolts, a can of [[Gasoline]], 1 [[Napalm C]] and 1 [[Magnesium Powder]]. | ||
| + | |||
| + | The third and final group can be found in the eastern corridor. Again, they are located after a pushable rock (strength 8 required). | ||
| + | |||
| + | At the southern end of the eastern corridor, the player can find some [[Destructible rocks]], behind which a deactivated [[Sentry Bot]] sits quietly. The rocks can be dispatched by either pushing the aforementioned rock, or using [[TNT_Charge|TNT charge]]. The sentry bot can then be powered up using any kind of [[Batteries|Battery]]. Doing so will cause the sentry bot to join the player as a temporary follower. Note that the friendly bot will not leave the caves when the player exits. | ||
| + | |||
| + | Finally, at the centre of the cave, the player can find a [[Burrower_Warrior|Burrower Warrior]] munching on the corpse of a [[Dead_Body|Dead Man]]. The Warrior can be easily killed by using any of the previous rocks encountered (provided that the player killed the respective group by hand). If you want to use this strategy, simply lure the warrior back to the second pushable rock and activate it. | ||
| + | |||
| + | Looting the corpse of the dead man yields another [[Leather Armor|Rathound Leather Armor]], a [[Hawker|7.62 Hawker XM]] pistol, a [[Supercharged_Lithium_Cell|Supercharged Lithium Cell]], 3 [[Vial|Vials]], and a [[Shield_Emitter|High Frequency Shield Emitter]]. | ||
== Map Gallery == | == Map Gallery == | ||
Latest revision as of 10:21, 21 November 2023
| GMS compound | |||||
The GMS compound used to belong to Omega station, before it was abandoned.
| |||||
|---|---|---|---|---|---|

| |||||
| Dungeon information | |||||
| Music | Cornered | ||||
| Located in | Lower Underrail | ||||
| Areas | GMS compound level 1 GMS Compound - Cave GMS compound level 2 GMS compound level 3 Burrower Caves | ||||
| Connections | GMS warehouse block Upper Caves Lower Caves | ||||
| NPCs | Gorsky, Sully | ||||
| |||||
GMS compound is the first major dungeon the player visits during Underrail storyline. It is located in Lower Underrail, and can be accessed via the Lower Underrail exit from South Gate Station, by heading north from the station platform on SGS level 1.
The player travels there during Gorsky's task and is tasked with finding a way to open the sealed door on the first level of GMS compound.
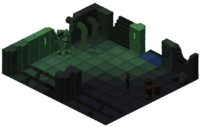
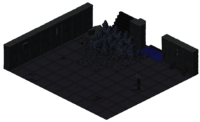
Level 1: Offices
The initial level, some dusty old offices full of rathounds and junk. A large sealed door is located near the entrance. To the west is an unpowered elevator, to the northwest are stairs and the power generator for the whole compound is also on this level.
An Omni-Tool can usually be found somewhere on the first level, and it proves useful as the whole compound proper is full of accessible ventilation shafts. Just remember that rathounds are more than capable of crawling inside the same ventilation tunnels.
During your mission here, Gorsky's team will be waiting near the entrance.
- A room in the southwest part of the area has a door requiring 25 Hacking.
- The room can also be entered through the ventilation shafts
- It contains a backpack with an Omega ID Card oddity, 1 XP
- The backpack also contains a Key (GMS)
- It also has hidden safe (detected with 7 Perception), which can be opened with 30 Lockpicking, contains 25 charons, a pistol and some ammo
- In the southeast corner is a Power Generator. It can be configured to bring power back to the elevator
- In the southeast part of the area, there's a room with a footlocker that requires 25 Lockpicking or can be opened with the Key (GMS). It contains one Psi Booster
- South of the entrance is a room with blood and bones. A locker in this room contains an Omega ID Card oddity, 1 XP
- West of the entrance is a room that has a door requiring 20 Lockpicking.
- There's another door/entrance in the back which is not locked (but the path to reach it is much longer)
- The northern desk in that room contains a Protectorate Propaganda oddity, 1 XP
- The same desk also has a Surveillance Room Keycard (GMS)
- The room to the northwest has a door that requires 20 Hacking
- It has another opening from the back, that can be reached from the ventilation shafts
- The southern locker in the room requires 30 Lockpicking, contains Bandages and 15 5mm W2C Rounds
- The middle locker in the room contains an Adrenaline Shot
- The northern locker in the room contains an Omega ID Card oddity, 1 XP
- The level 2 below can be reached:
- Either by using the stairs which is the exit in the northwest corner of the area
- Or by using the elevator on the west wall after restoring power with the generators in the southeast corner
- The storage room locked behind heavy doors on the north side can be opened after the quest is complete. Refer to Gorsky's task for details. It leads to the burrower caves
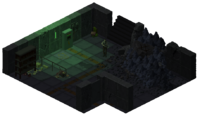
GMS Compound - Cave
An adjacent watery natural cave with even more rathounds in it. Some Mindshrooms also grow here.
- 3 respawning Mindshrooms
- Several rathounds including a Rathound Alpha
This cave also leads to Upper Caves area Upper Caves A6, but TNT Charges are needed to advance further.
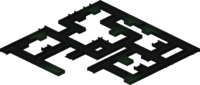
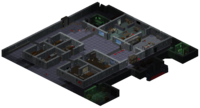
Level 2: Storage
This level is largely devoid of living creatures. Armed Sentry Bots and Small Sentry Bots roam around. Being seen by the cameras will attract the bots towards you. Breaking in to the storage rooms can yield some useful loot.
The stairway leading down is blocked by rubble, so the player has to find another way to advance.
- In the middle room:
- the upper box contains a Protectorate Propaganda oddity, 1 XP
- the dead body has an Emergency Hatch Key (GMS), which opens the trap door in the SE corner of the area
- In the southwest, 2 bluish rooms require 50 Hacking or Biology Lab Key Card (GMS) to open the doors
- The first one has 2 respawning Mindshrooms
- The second one has 1 respawning Mindshroom and a freezer containing a lot of Mindshrooms
- The room north of the mushrooms can be unlocked with 20 Hacking or with the Surveillance Room Keycard (GMS) found on the first floor
- The desk contains an Omega ID Card oddity, 1 XP
- Shelves contain two EMP Grenades
- The safe requires 30 Lockpicking
- To the south is a room requiring 30 Hacking to open any of its 2 doors
- It can also be accessed from the ventilation shafts
- The shelves contain an Omega ID Card oddity, 1 XP
- In the SE corner there are 2 rooms:
- The north one has shelves containing a Warehouse Inventory List oddity, 2 XP
- The north one also has a footlocker requiring 25 Lockpicking to open and containing an Omega ID Card oddity, 1 XP
- The south one has a locker containing a Protectorate Propaganda oddity, 1 XP
- The south one also has a trap door that requires 50 Lockpicking or can be opened with the Emergency Hatch Key (GMS) from the dead body in the same area.
- On the eastern wall are some shelves. The south one hides a secret passage (need 7 Perception) leading to a locker with some loot and an Old Data Medium oddity, 1 XP
- The room in the NE corner has 2 entrance doors, one is unlocked and the other requires 15 Lockpicking. It contains a metal crate with an Encyclopedia Fragment oddity, 1 XP
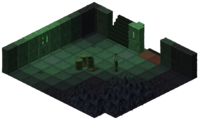
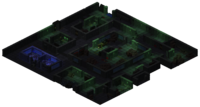
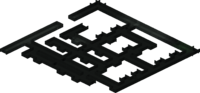
Level 3: Commons
This level consists of a relatively clean living area with cafeteria, and some storage rooms. The elevator on this level is broken, but it can be repaired with 15 mechanics skill. This level has been recently overtaken by raiders, coming in from the adjacent Lower Caves.
- The eastern exit leads to Lower Caves, area Caves 13
- The ladder room (first room accessed from the trap door on level 2) :
- The Old Citizen can provide information on how the turret near the elevator could be used to fight the raider
- The Raider has a Ladder Room Key (GMS)
- The door is locked and can be opened with the Ladder Room Key (GMS)
- North of the ladder room is a turret with a dead man who has Bloomberg's Key and Protectorate Propaganda oddity, 1 XP
- East block of 2 rooms with double beds, south room:
- The footlocker can be opened with 25 Lockpicking, contains some Supercharged Lithium Cells
- The desk contains an Omega ID Card oddity, 1 XP
- East block of 2 rooms with double beds, north room:
- The locker requires 25 Lockpicking, contains a Flashbang and 10 5mm W2C Rounds
- West block of 4 rooms, NE room:
- The footlocker requires 25 Lockpicking, contains a pistol
- West block of 4 rooms, SE room:
- The desk contains an Omega ID Card oddity, 1 XP
- West block of 4 rooms, SW room:
- The locker contains an Omega ID Card oddity, 1 XP
- There is a first aid box hidden under couch containing some medicine including an Advanced Health Hypo (need 7 Perception)
- West block of 4 rooms, NW room:
- The locker requires 30 Lockpicking or Bloomberg's Key (found on the dead man east of the same area).
- This locker contains the Level 1 Storage Keycard (GMS) need for the quest Gorsky's task
- Room to the northwest near the stairs
- The door can be opened with 20 Hacking or with the Surveillance Room Keycard (GMS) found on level 1
- The desk contains an Omega ID Card oddity, 1 XP
- The computer console can be used to reactivate the turret in the main corridor with at least 25 Hacking
- The kitchen contains multiple food items
- The elevator can be repaired with 15 Mechanics
- The NPCs Sully, Old Citizen and Citizen are all hostages to the raiders on this level
- Sully has a Biology Lab Key Card (GMS) (it can be pickpocketed with 24 effective skill)
- NPCs
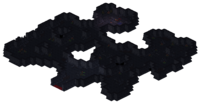
Burrower Caves
| This article needs cleanup. You can help Underrail Wiki by updating it. Reason given: This is a random dungeon and can have many different variants, not just this one. |
Burrower nesting area near the GMS compound. It is to the north of the storage room on the level 1 of the compound, and requires completing Gorsky's task first before it can be accessed (you may have to go back to South Gate Station and talk to Quinton to recover the keycard once the quest is complete).
The layout of the cave follows a clockwise spiral, ending at the middle of the cave.
Inside the cave, you will find 3 major groups of burrowers, consisting of 2-3 normal burrowers as well as 3-4 spawns. Note that there are a couple burrowers and spawns between these groups as well.
The first group can be found close to the entrance. As you advance, you will see the cave split into a small wing to the west, which will be inhabited by burrowers.
The second group is located on the northern corridor. It can be found immediately after the pushable rock (strength 8 required). Pushing the rock will trigger a cutscene and immediately dispatch the second group of borrowers. Note, however, that doing so, will block access to a small crevice to the east where the body of a Dead Woman can be found. From her body the player can loot a Rathound Leather Armor, a Molotov Cocktail, a Tornado Crossbow, 13 crossbow bolts, a can of Gasoline, 1 Napalm C and 1 Magnesium Powder.
The third and final group can be found in the eastern corridor. Again, they are located after a pushable rock (strength 8 required).
At the southern end of the eastern corridor, the player can find some Destructible rocks, behind which a deactivated Sentry Bot sits quietly. The rocks can be dispatched by either pushing the aforementioned rock, or using TNT charge. The sentry bot can then be powered up using any kind of Battery. Doing so will cause the sentry bot to join the player as a temporary follower. Note that the friendly bot will not leave the caves when the player exits.
Finally, at the centre of the cave, the player can find a Burrower Warrior munching on the corpse of a Dead Man. The Warrior can be easily killed by using any of the previous rocks encountered (provided that the player killed the respective group by hand). If you want to use this strategy, simply lure the warrior back to the second pushable rock and activate it.
Looting the corpse of the dead man yields another Rathound Leather Armor, a 7.62 Hawker XM pistol, a Supercharged Lithium Cell, 3 Vials, and a High Frequency Shield Emitter.
Map Gallery
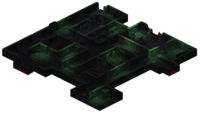
Level 1: Offices
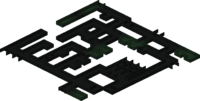
Level 1 ventilation shafts
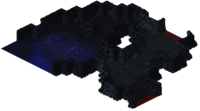
GMS Compound - Cave
Stairs from 1 to 2
Stairs from 2 to 1
Level 2: Storage
Level 2 ventilation shafts
Stairs from 2 to 3
Stairs from 3 to 2
Level 3: Commons
Level 3 ventilation shafts
Burrower Caves


| |||||||||||||||||||||||||||||||||||||||||||||||||||||||||||