Difference between revisions of "Gauntlet"
(+image, expanded a bit) |
|||
| Line 1: | Line 1: | ||
| − | {{Stub}} | + | {{Stub|reason=missing details of 2 challenge maps}} |
{{Quest Infobox | {{Quest Infobox | ||
| name = Run and win the Gauntlet | | name = Run and win the Gauntlet | ||
| type = side | | type = side | ||
| − | | image = | + | | image = Gauntlet entrance.png |
| location = [[Core City]] | | location = [[Core City]] | ||
| givenby = [[Andrea]] | | givenby = [[Andrea]] | ||
| Line 18: | Line 18: | ||
== Walkthrough == | == Walkthrough == | ||
| − | The Gauntlet consists of 8 levels and a final challenge. Many details are randomized to keep the Gauntlet | + | The Gauntlet consists of 8 levels and a final challenge. Many details are randomized to keep the Gauntlet interesting for multiple playthroughs. You will have to go through randomly chosen 4 of them plus the final challenge. Each challenge usually has a randomly placed key in it. Collecting those keys from the random challenges makes the final challenge easier and faster to finish, but your contestants may get ahead of you if you spend too much time looking for the keys. |
| + | |||
| + | Furthermore, you cannot use your own equipment during the Gauntlet. A variety of equipment is provided before the challenge starts and you can freely choose from them. You cannot bring back any loot from the Gauntlet. | ||
=== Challenge 1 === | === Challenge 1 === | ||
| − | <!--[[File:cc_g1.png|left|200px|Gauntlet | + | <!--[[File:cc_g1.png|left|200px|Gauntlet challenge 1]]--> |
unknown | unknown | ||
| Line 27: | Line 29: | ||
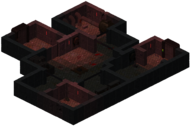
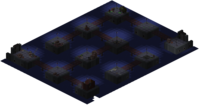
=== Challenge 2: Amazement === | === Challenge 2: Amazement === | ||
| − | [[File:cc_g2.png|left|100px|Gauntlet | + | [[File:cc_g2.png|left|100px|Gauntlet challenge 2]] |
This level is a timesink. A huge maze consisting of small rooms with slow roll-up doors between them. Some of the corridors have bear traps, but that's about it. | This level is a timesink. A huge maze consisting of small rooms with slow roll-up doors between them. Some of the corridors have bear traps, but that's about it. | ||
| Line 35: | Line 37: | ||
=== Challenge 3 === | === Challenge 3 === | ||
| − | <!--[[File:cc_g3.png|left|200px|Gauntlet | + | <!--[[File:cc_g3.png|left|200px|Gauntlet challenge 3]]--> |
unknown | unknown | ||
| Line 41: | Line 43: | ||
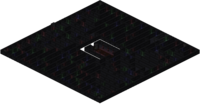
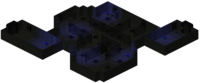
=== Challenge 4: electric floors === | === Challenge 4: electric floors === | ||
| − | <!--[[File:cc_g4.png|left|200px|Gauntlet | + | <!--[[File:cc_g4.png|left|200px|Gauntlet challenge 4]]--> |
Another pretty straightforward level, no enemies this time. If the electric floor hits you, it's instant death. High traps skill and movement speed is helpful here. Conversely, encumberance can be fatal. The fastest route is: right, left, forward, forward, wait. Then after electricity has passed: left, right, left. | Another pretty straightforward level, no enemies this time. If the electric floor hits you, it's instant death. High traps skill and movement speed is helpful here. Conversely, encumberance can be fatal. The fastest route is: right, left, forward, forward, wait. Then after electricity has passed: left, right, left. | ||
| Line 49: | Line 51: | ||
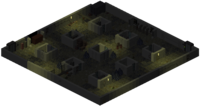
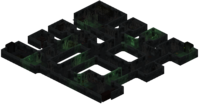
=== Challenge 5: Siphoners === | === Challenge 5: Siphoners === | ||
| − | <!--[[File:cc_g5.png|left|200px|Gauntlet | + | <!--[[File:cc_g5.png|left|200px|Gauntlet challenge 5]]--> |
This level is pretty straightforward, there are some siphoners and traps in here. Characters with high Detection and Stealth have easy time just waltzing through this area. | This level is pretty straightforward, there are some siphoners and traps in here. Characters with high Detection and Stealth have easy time just waltzing through this area. | ||
| Line 57: | Line 59: | ||
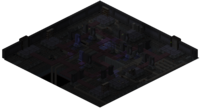
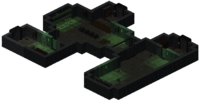
=== Challenge 6: Psichological Warfare === | === Challenge 6: Psichological Warfare === | ||
| − | <!--[[File:cc_g6.png|left|200px|Gauntlet | + | <!--[[File:cc_g6.png|left|200px|Gauntlet challenge 6]]--> |
This one is a smallish maze filled with [[Azuridae]]. More of them respawn within the maze room. Characters with high Stealth have easy time just waltzing through this area. | This one is a smallish maze filled with [[Azuridae]]. More of them respawn within the maze room. Characters with high Stealth have easy time just waltzing through this area. | ||
| Line 65: | Line 67: | ||
=== Challenge 7 === | === Challenge 7 === | ||
| − | <!--[[File:cc_g7.png|left|200px|Gauntlet | + | <!--[[File:cc_g7.png|left|200px|Gauntlet challenge 7]]--> |
unknown | unknown | ||
| Line 71: | Line 73: | ||
=== Challenge 8: Brain or brawn === | === Challenge 8: Brain or brawn === | ||
| − | <!--[[File:cc_g8.png|left|200px|Gauntlet | + | <!--[[File:cc_g8.png|left|200px|Gauntlet challenge 8]]--> |
This level has a puzzle with chemicals and boxes. It can be skipped, but then you'll have to fight some tough robots instead. | This level has a puzzle with chemicals and boxes. It can be skipped, but then you'll have to fight some tough robots instead. | ||
| − | The puzzle's goal is placing correct chemicals in correct boxes and then pulling the level to lit up 4 green lights. The correct chemicals are randomized each time the challenge is entered, so there is no static solution. | + | The puzzle's goal is placing correct chemicals in correct boxes and then pulling the level to lit up 4 green lights. Each correct chemical in a correct box lits up a green light, while each correct chemical in a wrong box lits up a yellow light. The correct chemicals are randomized each time the challenge is entered, so there is no static solution. |
To figure out which chemicals are the correct ones, take all of the chemicals from the locker and the boxes. You should have 4 of each chemical. Place a chemical of same type in each box and pull the lever. If one green light lights up, you have a correct chemical. If no green light, you can discard those chemicals. Repeat until you known which 4 chemicals are correct. Then, place a chemical of each 4 in one of the boxes. Swap them around until you find out which chemical goes to which box. | To figure out which chemicals are the correct ones, take all of the chemicals from the locker and the boxes. You should have 4 of each chemical. Place a chemical of same type in each box and pull the lever. If one green light lights up, you have a correct chemical. If no green light, you can discard those chemicals. Repeat until you known which 4 chemicals are correct. Then, place a chemical of each 4 in one of the boxes. Swap them around until you find out which chemical goes to which box. | ||
| Line 83: | Line 85: | ||
=== Final challenge === | === Final challenge === | ||
| + | <!--[[File:cc_gfin.png|left|200px|Gauntlet final challenge]]--> | ||
| + | |||
You will be racing against two NPC contestants in this challenge. The first one to reach the end wins and kills the other two contestants. | You will be racing against two NPC contestants in this challenge. The first one to reach the end wins and kills the other two contestants. | ||
| Line 93: | Line 97: | ||
Once you've either run past each room or successfully fought the enemies and looted keys from them, just pull the lever to open the exit and deal with your contestants. | Once you've either run past each room or successfully fought the enemies and looted keys from them, just pull the lever to open the exit and deal with your contestants. | ||
| + | |||
| + | == Map Gallery == | ||
| + | <gallery widths=200px heights=127px> | ||
| + | cc_g1.png | Challenge 1 | ||
| + | cc_g2.png | Challenge 2 | ||
| + | cc_g3.png | Challenge 3 | ||
| + | cc_g4.png | Challenge 4 | ||
| + | cc_g5.png | Challenge 5 | ||
| + | cc_g6.png | Challenge 6 | ||
| + | cc_g7.png | Challenge 7 | ||
| + | cc_g8.png | Challenge 8 | ||
| + | cc_gfin.png | Final challenge | ||
| + | </gallery> | ||
Revision as of 03:35, 12 August 2014
| This article is a stub. You can help Underrail Wiki by expanding it. Reason given: missing details of 2 challenge maps |
| Run and win the Gauntlet | ||
| Sidequest | ||
|---|---|---|

| ||
| Quest information | ||
| Location | Core City | |
| Given by | Andrea | |
| Rewards | ? classic XP / 5 oddity XP 2000 Stygian Coin | |
| Related quests | ||
| Arena | ||
|
| ||
Once you have defeated the fourth Arena gladiator, you can also apply for the Gauntlet.
Objectives
- Apply for and successfully finish the Gauntlet
Walkthrough
The Gauntlet consists of 8 levels and a final challenge. Many details are randomized to keep the Gauntlet interesting for multiple playthroughs. You will have to go through randomly chosen 4 of them plus the final challenge. Each challenge usually has a randomly placed key in it. Collecting those keys from the random challenges makes the final challenge easier and faster to finish, but your contestants may get ahead of you if you spend too much time looking for the keys.
Furthermore, you cannot use your own equipment during the Gauntlet. A variety of equipment is provided before the challenge starts and you can freely choose from them. You cannot bring back any loot from the Gauntlet.
Challenge 1
unknown
Challenge 2: Amazement

This level is a timesink. A huge maze consisting of small rooms with slow roll-up doors between them. Some of the corridors have bear traps, but that's about it.
The elevator to the next challenge is in the middle of this level. Each corner of the level has a shelf with some random loot and one of them has a random Gauntlet Key.
Challenge 3
unknown
Challenge 4: electric floors
Another pretty straightforward level, no enemies this time. If the electric floor hits you, it's instant death. High traps skill and movement speed is helpful here. Conversely, encumberance can be fatal. The fastest route is: right, left, forward, forward, wait. Then after electricity has passed: left, right, left.
The elevator to the next challenge is in the northeast corner. One of the containers has a random Gauntlet Key.
Challenge 5: Siphoners
This level is pretty straightforward, there are some siphoners and traps in here. Characters with high Detection and Stealth have easy time just waltzing through this area.
Elevator to the next challenge is in northeast corner. One of the containers has a random Gauntlet Key.
Challenge 6: Psichological Warfare
This one is a smallish maze filled with Azuridae. More of them respawn within the maze room. Characters with high Stealth have easy time just waltzing through this area.
The elevator to the next challenge is in the northeast corner. One of the lockers has a randomized Gauntlet Key.
Challenge 7
unknown
Challenge 8: Brain or brawn
This level has a puzzle with chemicals and boxes. It can be skipped, but then you'll have to fight some tough robots instead.
The puzzle's goal is placing correct chemicals in correct boxes and then pulling the level to lit up 4 green lights. Each correct chemical in a correct box lits up a green light, while each correct chemical in a wrong box lits up a yellow light. The correct chemicals are randomized each time the challenge is entered, so there is no static solution.
To figure out which chemicals are the correct ones, take all of the chemicals from the locker and the boxes. You should have 4 of each chemical. Place a chemical of same type in each box and pull the lever. If one green light lights up, you have a correct chemical. If no green light, you can discard those chemicals. Repeat until you known which 4 chemicals are correct. Then, place a chemical of each 4 in one of the boxes. Swap them around until you find out which chemical goes to which box.
The elevator to the next challenge is right after the puzzle room. For completing the puzzle, you will get random Gauntlet Key.
Final challenge
You will be racing against two NPC contestants in this challenge. The first one to reach the end wins and kills the other two contestants.
This challenge is easy if you have gathered keys. You simply have to run to east. The doors to your your right allow you to skip rooms if you have the key, whilst the door in front enters the challenge rooms.
- Gauntlet Key - Red allows you to skip the first room (rathound).
- Gauntlet Key - Blue allows you to skip the second room (siphoners).
- Gauntlet Key - Green allows you to skip the third room (burrowers).
- Gauntlet Key - Yellow allows you to skip the fourth room (robots).
Once you've either run past each room or successfully fought the enemies and looted keys from them, just pull the lever to open the exit and deal with your contestants.
Map Gallery
Challenge 1
Challenge 2
Challenge 3
Challenge 4
Challenge 5
Challenge 6
Challenge 7
Challenge 8
Final challenge


| |||||||||||||||||||||||||||||||||||||||||||||||||||||||||||